Help Centre
Support > Ecommerce > Processing Your Orders
How to use Order Management
Jump To Section:
- What Is Order Management
- How Order Management works
- How To Change An Order Status
- How to Filter Orders
- How To Edit An Order
- How To Delete An Order
- How To Set Up Your Customer Notification Emails
- How To Customise Dispatch Notes
- How To Print Dispatch Notes
What Is Order Management
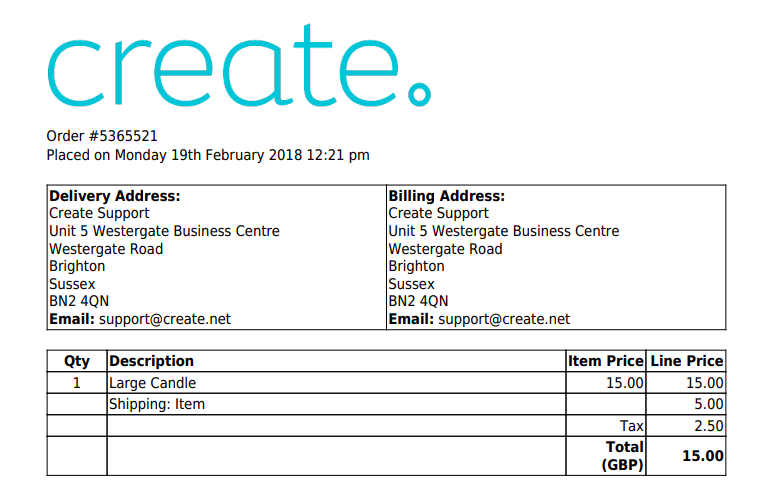
Order Management is a great feature that enables you to track and process all of your orders from one place. It allows you to process each order as soon as it comes in, while automatically sending your own personalised customer notification emails and creating your own dispatch notes.
Please note that all orders in Order Management - and notification emails - are in GMT time - see our guide for more information relating to this.
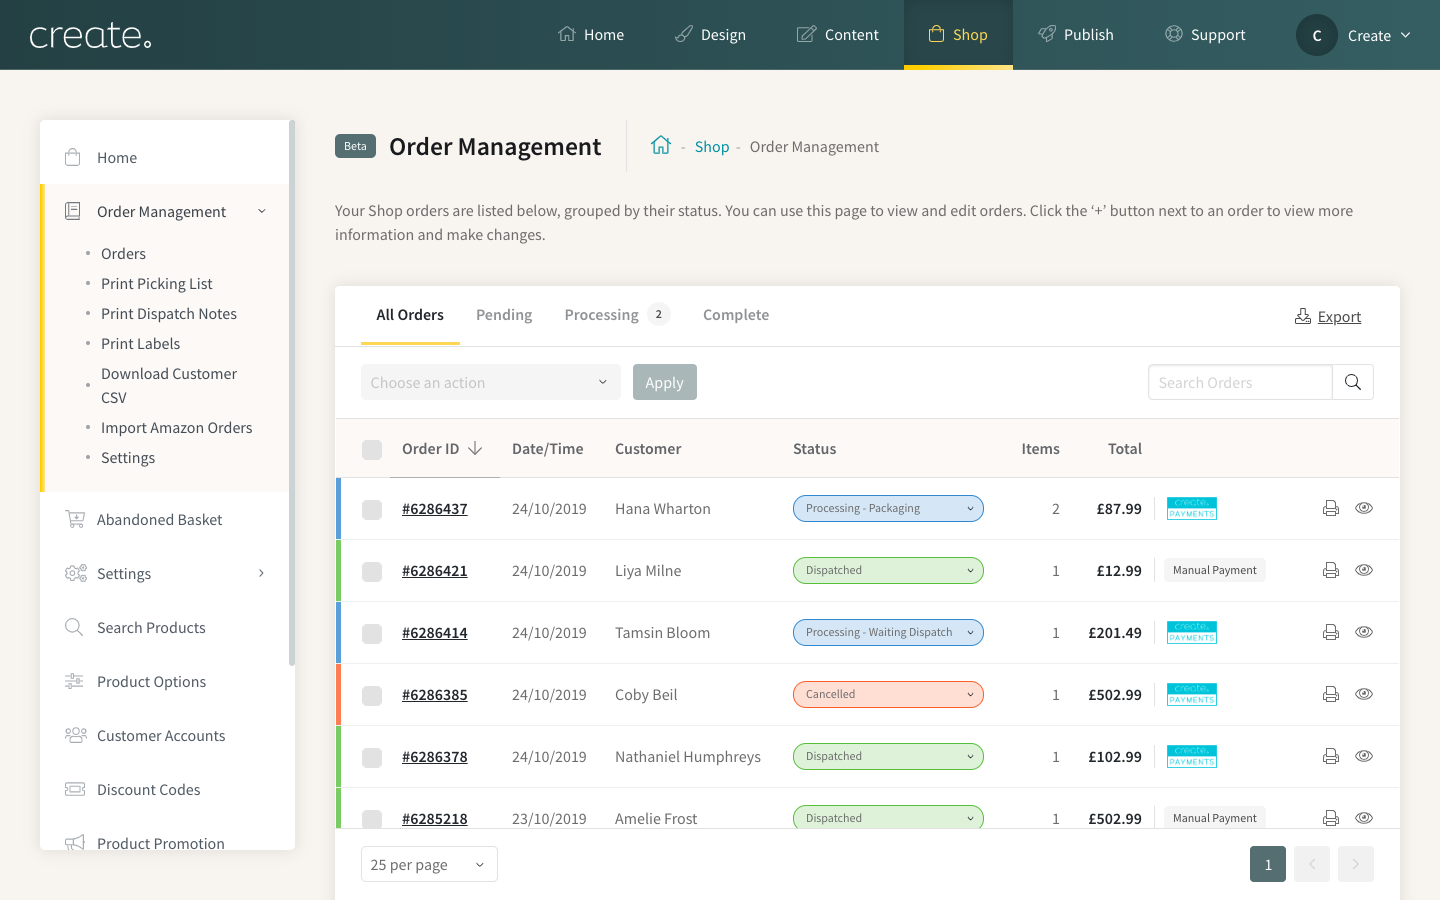
How Order Management Works
When a customer places an order on your Create site you will receive an email notification of this order from both Create and the Payment Gateway provider used by the customer.
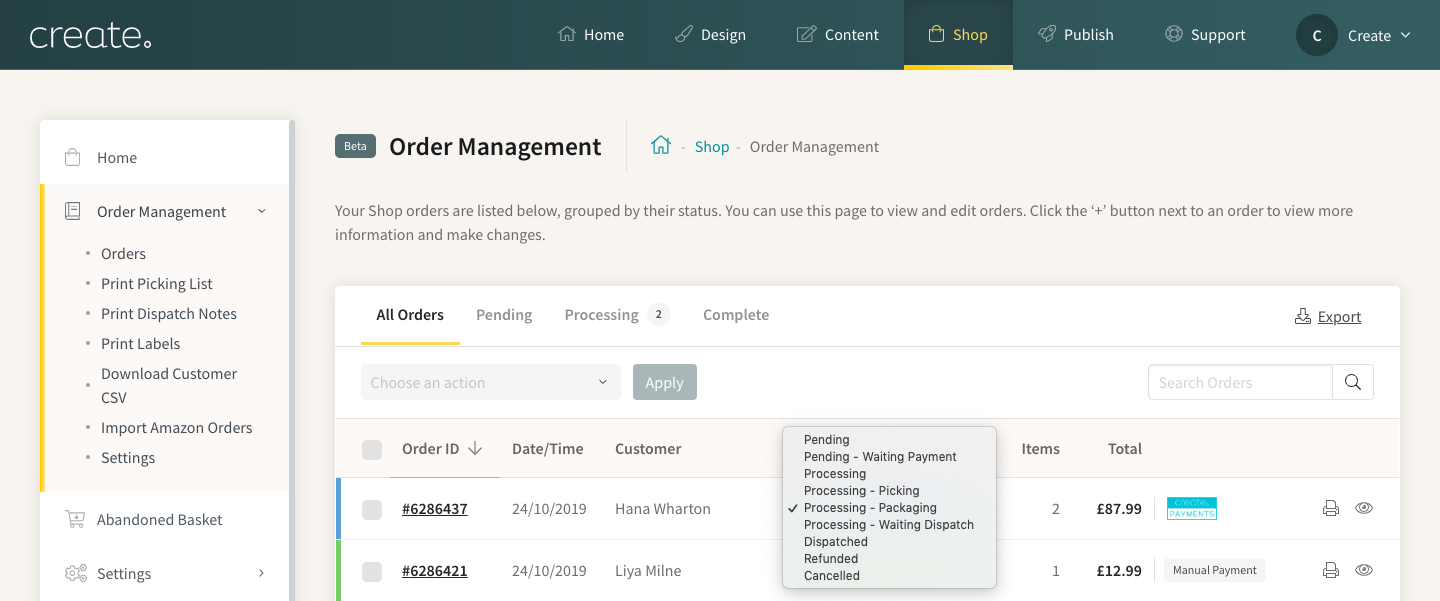
This order will appear in your Order Management, detailing all you need to know to process this order. As you begin to process your order you can change the progress of your order to the status' detailed below:
- Pending
- Pending – Waiting Payment
- Processing
- Processing – Picking
- Processing – Packaging
- Processing – Awaiting Dispatch
- Dispatched
- Refunded
- Cancelled
You can set up emails to automatically send to your customers notifying them of the progress of their order when they are set to the following status’ below:
- Processing
- Dispatched
- Refunded
Once this status is changed, your order will then move through your Order Management and group with orders at the same processing stage, meaning you can keep track of all orders you need to process.
How To Change An Order Status
As your order is processed you will need to update its status in your Order Management to ensure the correct email notifications are sent to your customer and you can keep track of what you need to do next.
To change the order status, please follow the steps below:
- Click Shop from the Top Menu
- Click Order Management from the left-hand menu
- Click on the current Status next to an order to select a new one or click on the View Order (eye) icon to expand the order and select a new status beside the order number
- Select a new status from the drop-down list
- A modal window will appear. Select Yes to confirm
- Your order will then update to the new status.
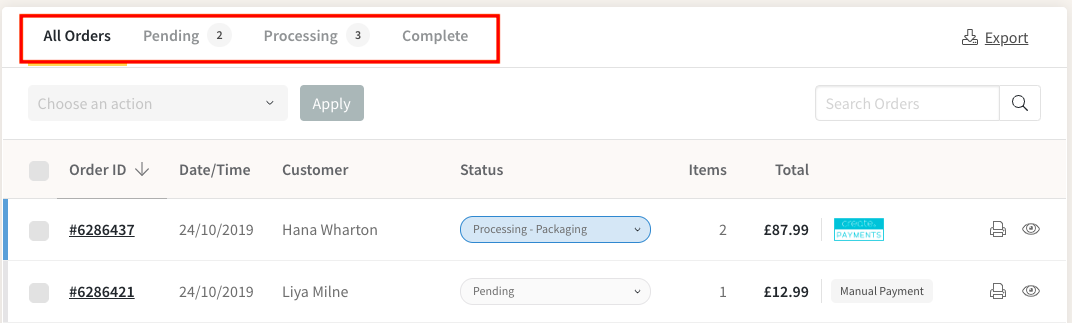
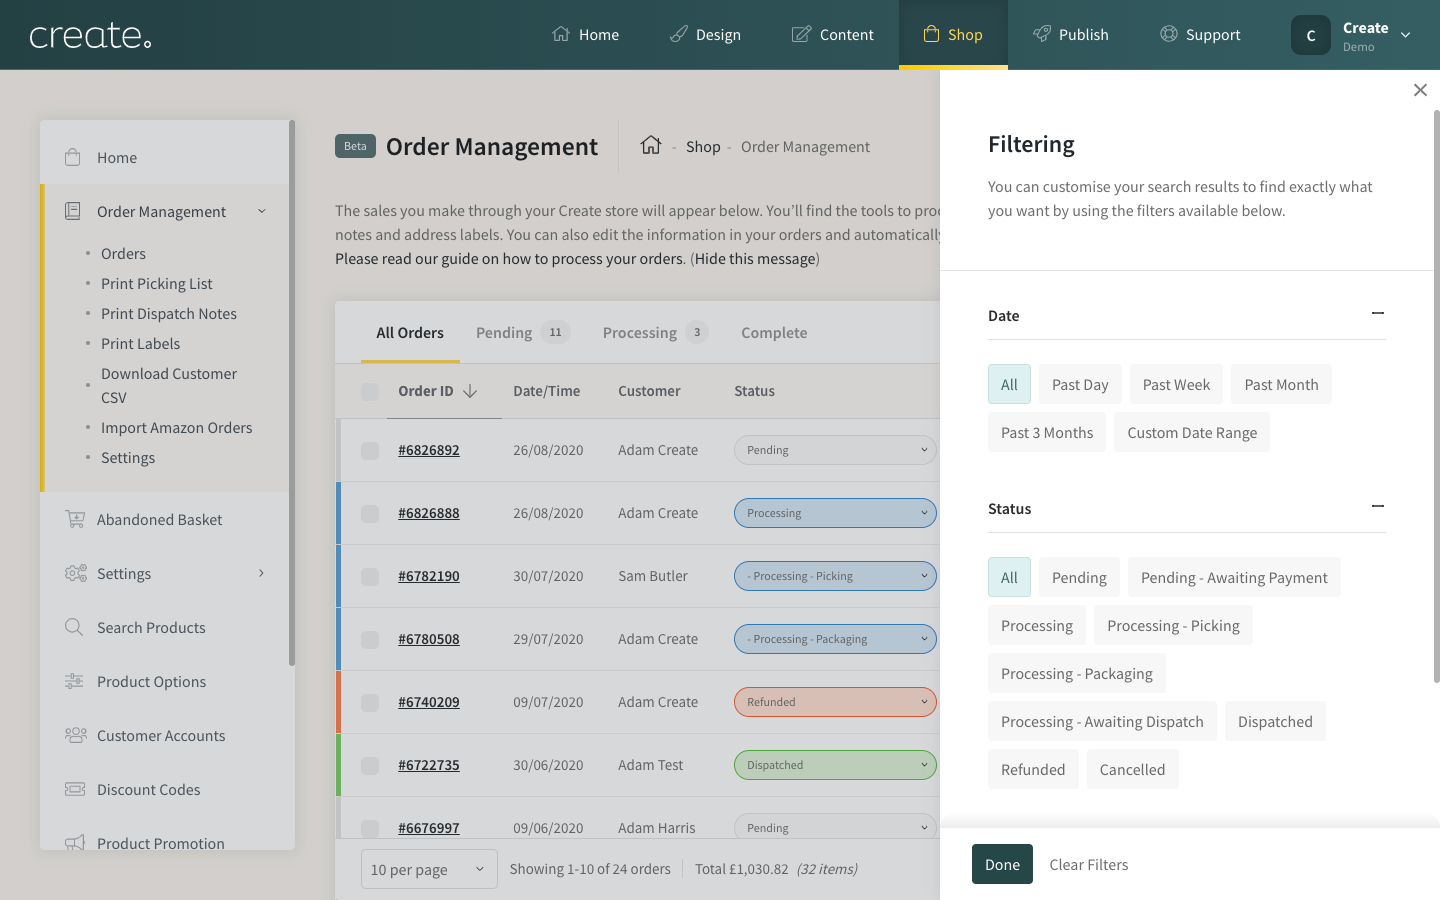
How to Filter Orders
Once you have orders populated in the Order Management, you might find occasions where you wish to view orders of only a certain status or payment gateway. Using the Filters tool, you can specify a selection of different variables to filter which orders are displayed. You can learn more about this function here
To access the filters, please follow the steps below:
1. Click Shop from the Top Menu, followed by Order Management in the left-hand menu
2. Click the Filters tab
3. Click on the various filters you wish to restrict the results
4. Click Done to have orders displayed that meet the active filters you selected
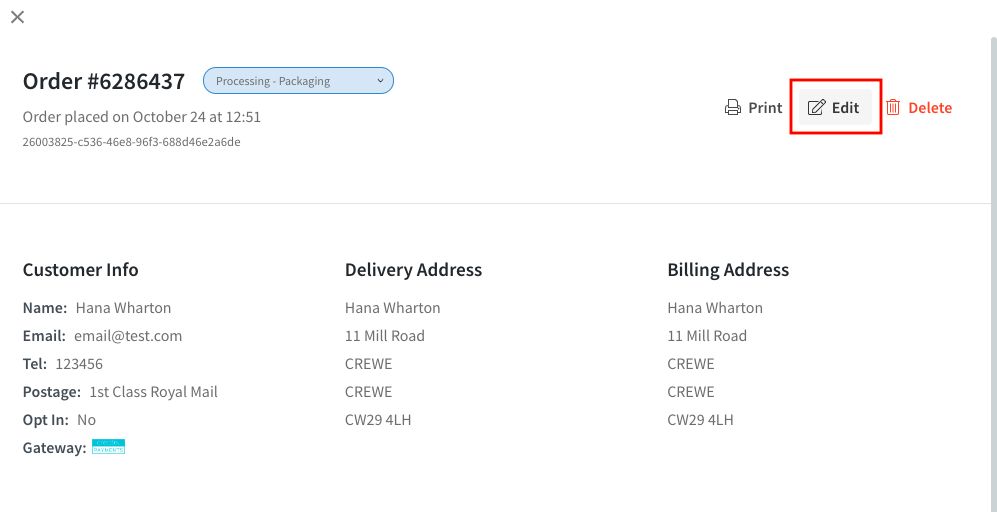
How To Edit An Order
If some information has been entered incorrectly or is misspelled you can edit your order to rectify this. To edit an order in your Order Management, please follow the steps below:
- Click the View Order icon next to the order you wish to edit
- The order details screen will appear
- Click Edit
- Select the information you wish to amend and make the changes
- Click Update Order Details to confirm
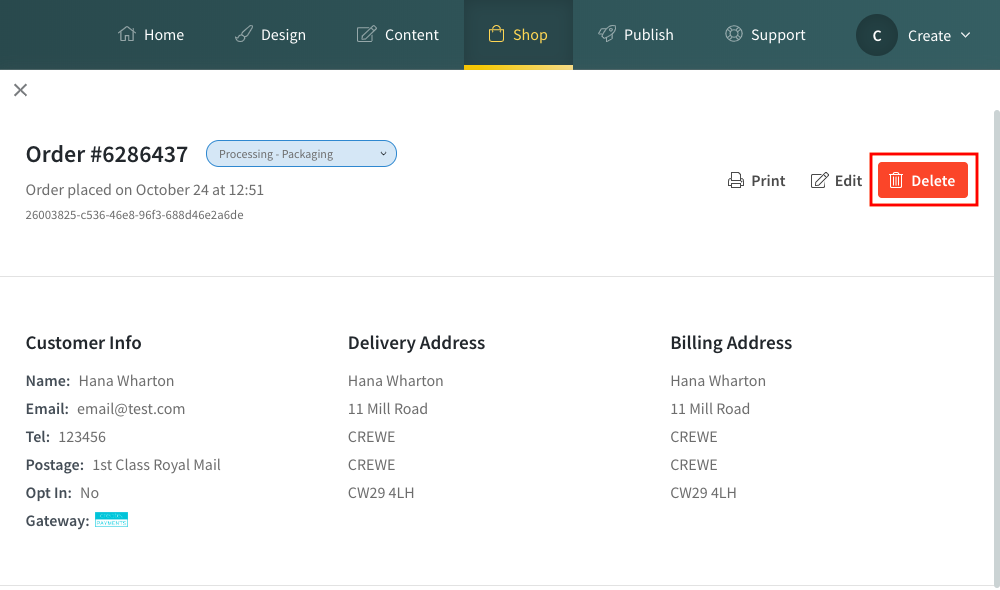
How To Delete An Order
To delete an order from your Order Management, please follow the steps below:
- Click the View Order icon next to the order you wish to delete
- The order details screen will appear
- Click Delete
- A modal will display asking you to confirm the deletion
- Click Yes to confirm
**Please note that deleted orders cannot be retrieved**
How To Set Up Your Customer Notification Emails
With Order Management, you can send different notification emails to notify your customer of the progress of their order.
The following emails can be sent to update customer's on their order status:
- Order Confirmation email
- Processing email
- Dispatch email
- Refund email
Order Confirmation Email
This email will automatically be sent after a customer completes a purchase from your shop. This email confirms the order details to your customer.
To set up an Order Confirmation email please follow the steps below:
- Click Shop from the Top Menu
- Click Order Management from the left-hand menu, followed by Settings
- Add your desired text in the Order Confirmation Email text box. This text will appear above the order details and you can use tags to generate different information. (Customer first name, last name, and Order ID tags are there by default)
- Click Save Changes to confirm
Processing Email
To set up a Processing email please follow the steps below:
- Click Shop from the Top Menu
- Click Order Management from the left-hand menu, followed by Settings
- Click the Emails tab
- Scroll to the Send Processing Emails section
- Click the drop-down menu to select the rule you wish to use. You can select from Never Send, Confirm Before Sending or Send Automatically
- Add a subject for the email to the Processing Subject field
- Add your desired text in the Processing Email text box. (Tags can be used to include dynamic content in the email)
- Click Save Changes to confirm
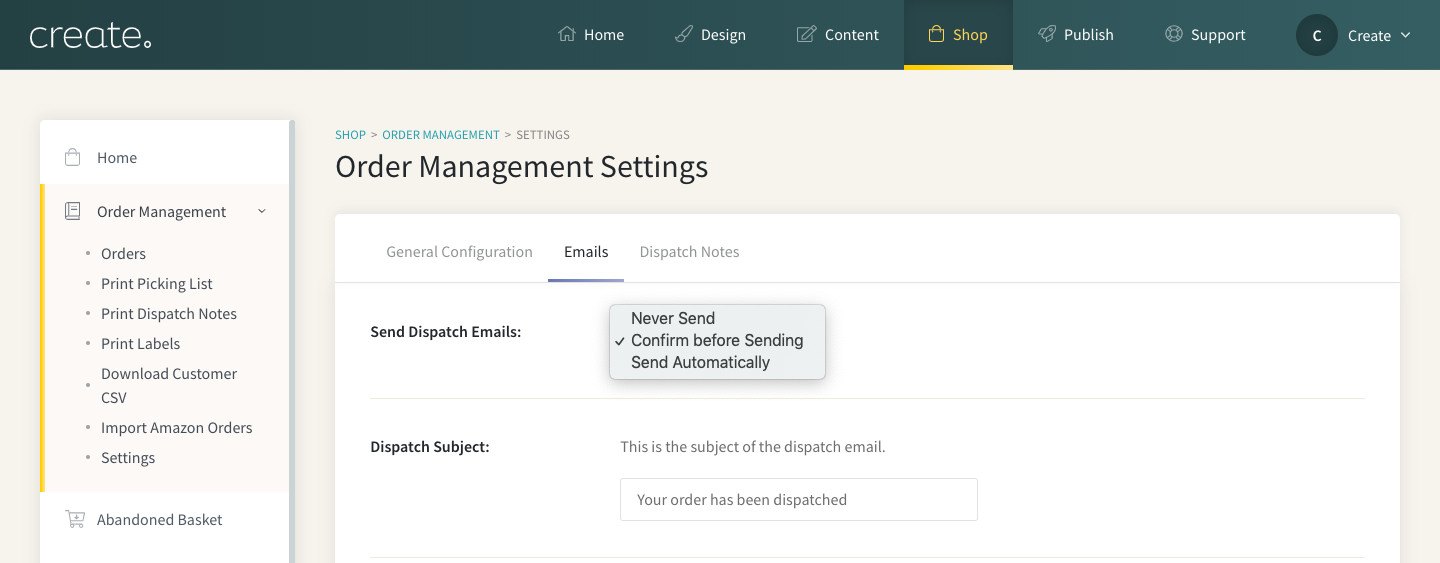
Dispatch email
To set up your Dispatch email please follow the steps below:
- Click Shop from the Top Menu
- Click Order Management from the left-hand menu, followed by Settings
- Click the Emails tab
- Scroll to the Send Dispatch Emails section
- Click the drop-down menu to select the rule you wish to use. You can select from Never Send, Confirm Before Sending (default) or Send Automatically
- Add a subject for the email to the Dispatch Subject field
- Add your desired text in the Dispatch Email text box. (Tags can be used to include dynamic content in the email)
- Click Save Changes to confirm
Refund email
To set up a Refund email please follow the steps below:
- Click Shop from the Top Menu
- Click Order Management from the left-hand menu, followed by Settings
- Click the Emails tab
- Scroll to the Send Refund Emails section
- Click the drop-down menu to select the rule you wish to use. You can select from Never Send, Confirm Before Sending or Send Automatically
- Add a subject for the email to the Refund Subject field
- Add your desired text in the Refund Email text box. (Tags can be used to include dynamic content in the email)
- Click Save Changes to confirm
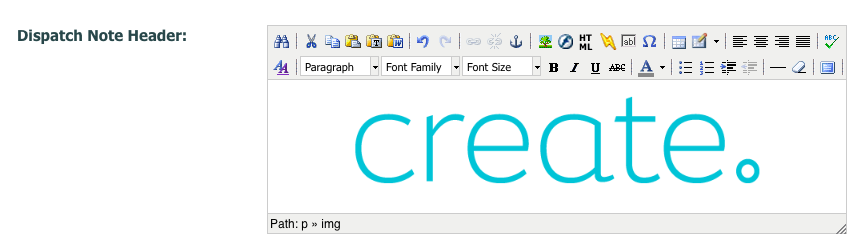
How To Customise Your Dispatch Notes
To customise the Dispatch Note to include your business logo and any text of your choosing please follow the steps below:
- Click Shop from the Top Menu
- Click Order Management from the left-hand menu, followed by Settings
- Click the Dispatch Notes tab
- Use the Dispatch Note Header section to upload your business logo
- Use the Dispatch Note Footer section to add any text you would like to include. (Tags can be used to include dynamic content in the email)
- Click Save Changes to confirm
How To Print Your Dispatch Notes
To print a Dispatch Note to include within a customers order, please follow the steps below:
- Click Shop from the Top Menu
- Click Order Management from the left-hand menu, followed by Print Dispatch Notes
- Any orders with the status Processing - Packaging will have a PDF displayed
- Use your web browser to either download or print the Dispatch Note(s)
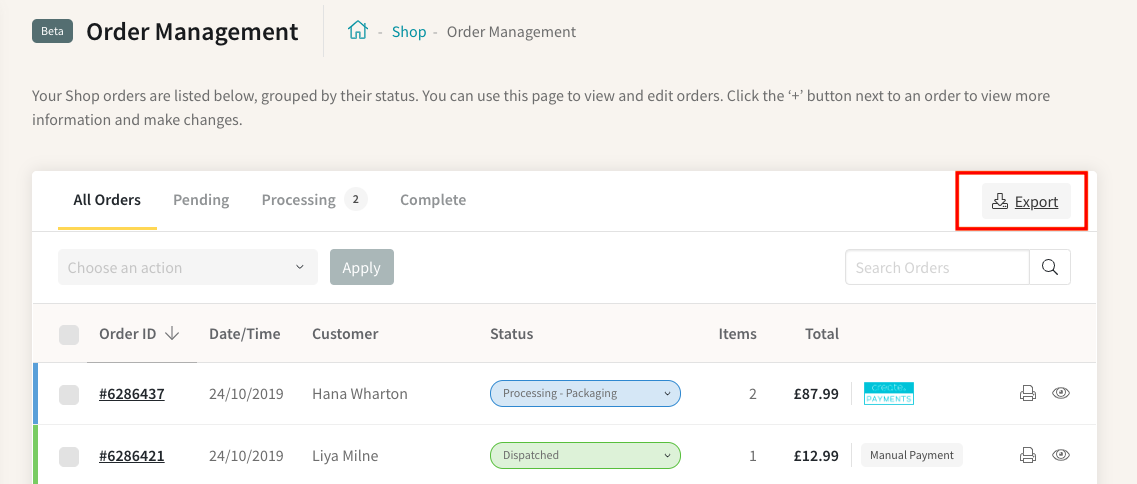
Financial Transaction Export Tool
Order Management is an excellent tool for managing your shop orders. It also features a Financial Transaction Export tool. This allows you to download a CSV spreadsheet file of your customers' financial transactions with you onto your device.
To use the Financial Export Tool, please follow the steps below:
- Click Shop from the Top Menu
- Click Order Management from the left-hand menu
- Click the Export button above the Order Management table
- Select the date range and data type you wish to export
- Click Download and the file will be saved to your device
For further information on the Financial Export tool, please click here.
Related Articles
Related Articles


More Questions?
If you have any further questions, please get in touch and we will be happy to help.
Get in Touch