Help Centre
Support > Promoting Your Website > Search Engine Optimisation
How to track your sales using Google Analytics
Google Analytics is a powerful statistics program that you can use to track visits on your website, but it does so much more than just show you how many people have visited.
In this guide we will be looking into how you can use Google Analytics' "goal" feature to monitor customers who have actually made a purchase on your website.
If you haven't done so already, you will need to set up an account with Google Analytics and link it to your Create website. You will also need to get to grips with the basics of the program first. You can read how to do this on our "How to Track my SEO results using Google Analytics" guide here.
You can use goals to monitor customers that take certain, specific, steps on your website. This is particularly useful because you can track the number of visitors that actually complete a purchase on your website by specifying which customers have both gone to your "Checkout" page and then also to your "Thank you" page. You could then go on to compare that data to the number of visitors to your site to see what percentage of your website's visitors actually buy something.
To set up your Google Analytics account to track sales made on your Create website, please follow the steps below:
1. Log in to your Google Analytics account.
2. Click "Admin" from the top menu bar.
3. In the "Account" Column, select the website you wish to track sales (if you have more than one in your account).
4. In the "View" column, select "Goals"
5. Click "+New Goals" from this page
6. Choose a template from the options available. "Checkout Complete" will allow you to track sales. (Alternatively you can create a "Custom" goal).
7. Give the "Goal Description" a name relevant to what you are tracking within the Goal.
8. Choose the Goal "Type" as "Destination" and select "Next Step".
10. In the "Destination" Field enter "ourshop_thanks.html" and set the drop down to the left as "regular expression".
11. Next you will want to include visiting your basket page as a step here. So scroll down to the "Funnel" section and toggle this to "On".
12. In the "Step 1" URL field type exactly: "shop/checkout_process.php".
13. Then in the "Name" field write "Checkout".
14. Toggle the "Required" option to "Yes" and click "Save".
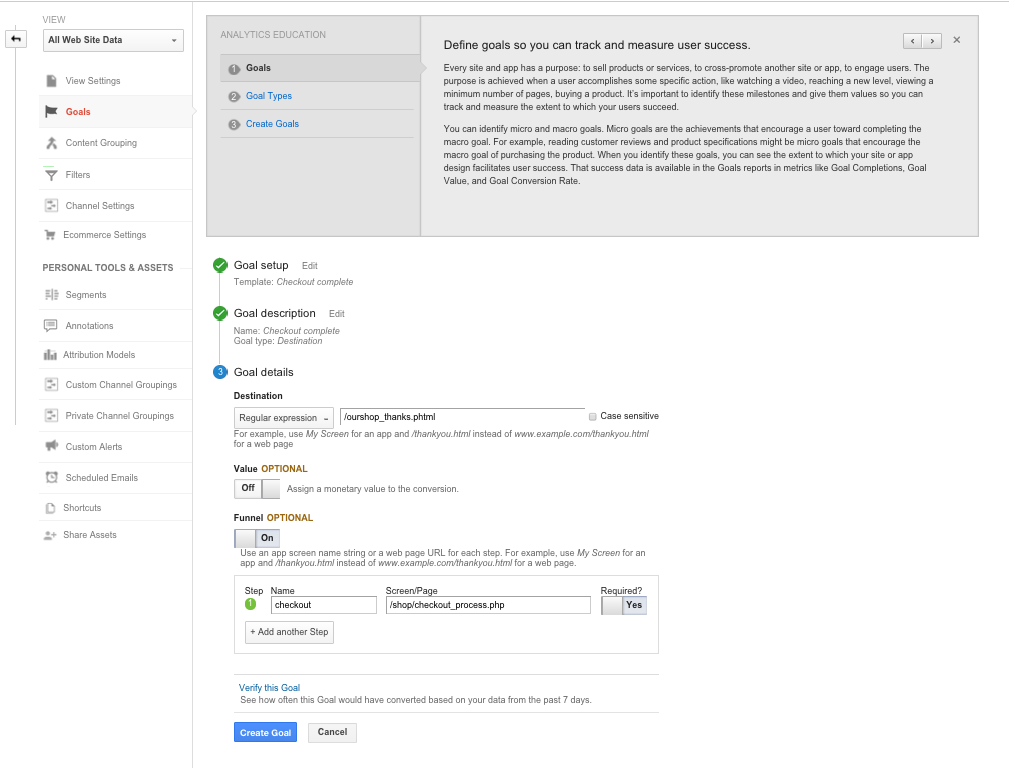
Example setup of your goal page in Google Analytics.
Your goal is now set up! Please allow at least 24 hours for results to start filtering in from your Website.
You can start viewing your results (as they come in) by following these steps:
1. Click "Reporting" on the top menu bar.
2. Click "Conversions" on the left-hand menu.
3. Click "Goals" from the options that drop down.
4. Click "Overview".
5. Here you can specify which goal you wish to see data on by choosing your goal from the "Goal Option" drop-down menu.
Also, don't forget you can set up a "dashboard" on your Google Analytics account to show certain data side by side. You can use this to compare your website's visits to your goal completions (so you can see the number of people visiting your website compared to the number of people who buy something). You can read how to use Dashboards on Google's help pages here.
You can actually use goals in a number of other great ways too. For example, you could set one up to see 'what visitors go to your contact form page and then submit the form', or 'customers that have come from your social network to then make a sale'. You just need to think about what you ideally want your customers to do once they get on your website, and then set up a goal to see how many do it. For further reading on goals, please see Google's help pages on setting up Goals here.
Related Articles
Related Articles


More Questions?
If you have any further questions, please get in touch and we will be happy to help.
Get in Touch