Help Centre
Support > Designing and Building Your Website > Adding Your Content
How To Add Facebook Messenger Live Chat To Your Website

Offering your customers more ways to contact you has become increasingly important when selling online. A great way to communicate with visitors to your website in recent times is to offer a live chat feature on your website.
Meta offers a free integration of their Messenger platform for you to use on your website. This can be completely managed through your Messenger account, meaning that you can respond to enquiries wherever you are.
The process to get this plugin setup is simple and you can change your colours and introductory message to style the live chat box to suit your website.
It is not possible to activate this feature through Facebook’s mobile app. This plugin should be installed using a desktop.
Some Adblockers prevent the Facebook Messenger Live Chat icon from displaying on the page. You may have to switch adblockers on your browser off temporarily while you install the feature on your website.
How To Obtain Your Facebook Messenger Code
-
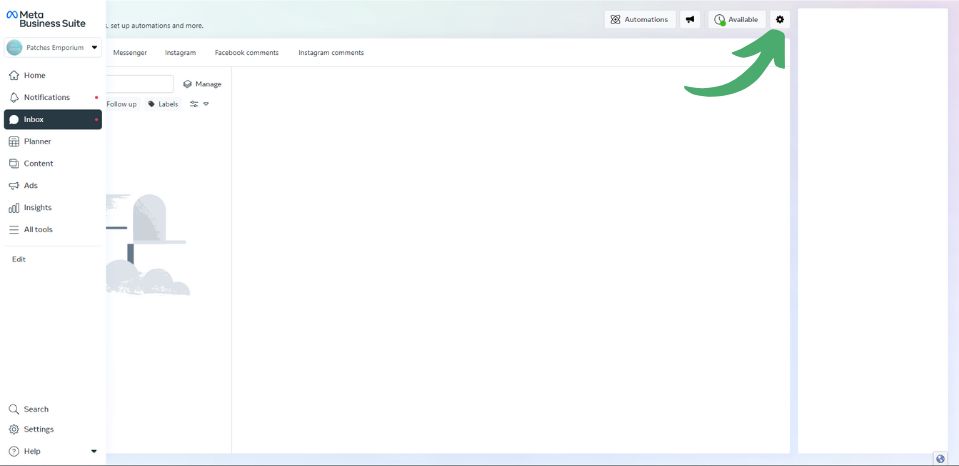
Go to Meta Business Suite (make sure you have the right page selected at the top of the left-hand menu)
-
Click Inbox in the left-hand menu
-
Click the Settings gear in the top-right
-
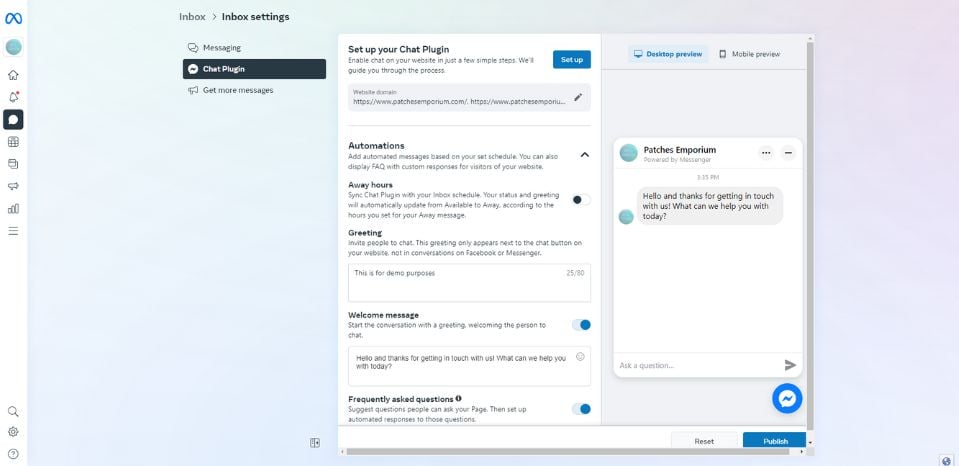
Select View all settings at the bottom of this menu
-
Click Chat Plugin
-
On this page, you can customise a lot of the features of your chat plugin, such as your Away Hours, Welcome Message, Button Styles, Colour and more. Customise these settings to your preference. (Note: Under Prominence, we’d recommend selecting the “Button” option so that the full window doesn’t open on every page)
-
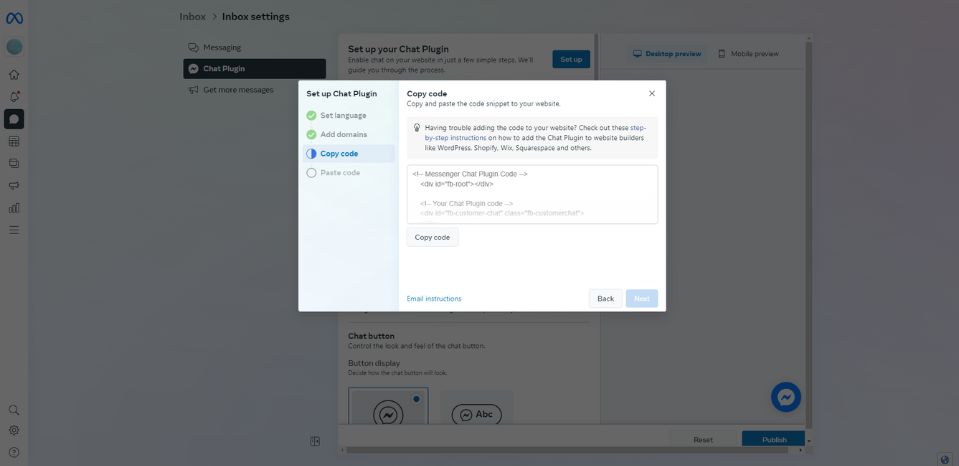
When you’re finished customising your plugin, scroll back to the top and select Set up
-
Select Standard as the setup method
-
Work through the language and domain settings
-
Copy the code Facebook provides to your clipboard.
How To Add Your Facebook Messenger Code To Your Website
Want Your Own Website?
Start Building Today!
No credit card needed. By submitting this form you agree to our T&Cs and Privacy Policy.
-
Select Content on the Top Menu.
-
Click Integrations & HTML > Integration Library from the left-hand menu
-
Click the Custom HTML > Add Integration
-
Give the HTML a description for reference (e.g. Facebook Messenger Widget).
-
Paste your HTML code into the large HTML Code box.
-
In the Area section, select the Manual option.
-
Click Add Integration to save your code.
-
Next, click Site Footer from the left-hand menu.
-
Add your Custom HTML to the Custom Footer Content by clicking the HTML icon on the toolbar, selecting your HTML Fragment from the drop-down list and clicking the Save Changes button when done.

-
Publish your site for the changes to take effect on your live website.
- Head back to Meta Business Manager to click through the rest of the process and hit Publish at the bottom to complete the setup
Related Articles
Related Articles


More Questions?
If you have any further questions, please get in touch and we will be happy to help.
Get in Touch