Help Centre
Support > Ecommerce > Accepting Payments Through Your Shop
How to Set Up Paypal As A Payment Gateway
PayPal is one of the most popular payment gateway options for online shoppers and has benefits for you as the business owner too. As one of the leading online payment providers, it facilitates millions of transactions a day through a secure and speedy platform.
Jump To Section:
- How To Set Up PayPal In Your Create Account
- How To Update To The Latest PayPal Integration (Existing PayPal Users)
- How To Adjust Your PayPal Checkout Settings
- How To Enable PayPal ‘Pay Later’
- How to Accept Apple Pay and Google Pay Payments through PayPal
How To Set Up PayPal In Your Create Account
To use PayPal as the payment gateway provider for your online shop you will need to apply for a Business account with them. You can do so by clicking here.
Once you have a PayPal Business account, please follow the steps below to add PayPal to your account.
Please note, due to a change enforced by PayPal, there is a very specific action we require you to take to complete this integration. Please make sure to follow the instructions below carefully.
1. Log in to your Create account
2. Click Shop from the top menu, followed by Payment Gateways
3. Click the Add Gateway button
4. Locate the PayPal gateway and click on it

5. Click the Connect with Paypal button
6. PayPal will open in a new tab or window asking you to enter your PayPal email address and country. You will then be asked to sign in to your PayPal account.
7. PayPal will ask for confirmation you approve connecting your account to Create.
8. You will then be returned to your Create account in the PayPal section. You should now see a Check Connection button visible. Please click this button and this should complete the connection.
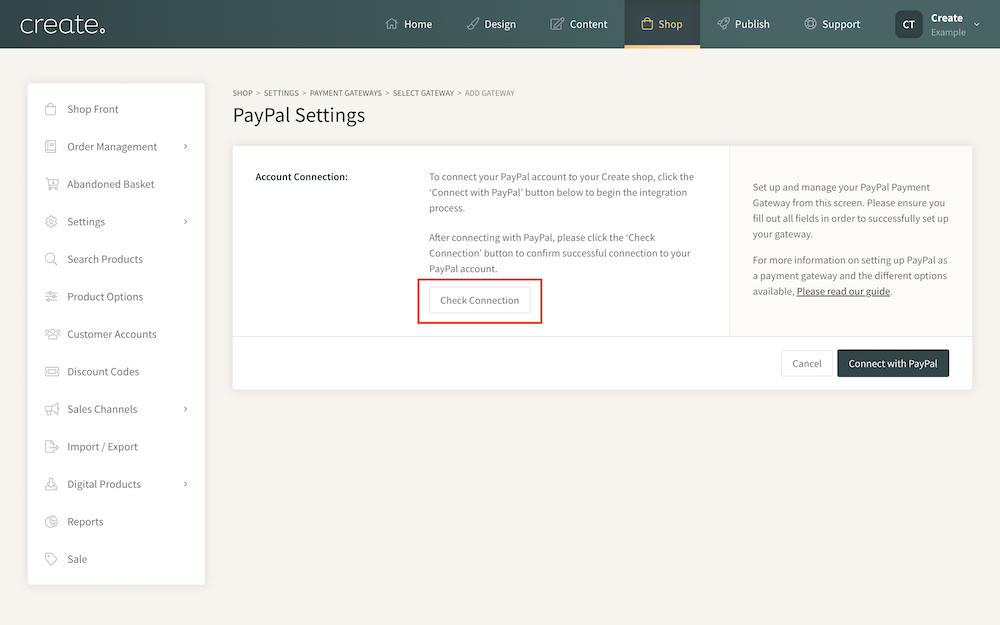
9. The connection should then be complete and you will be returned to your Create account. A confirmation message should be visible showing PayPal is connected and details of the connected account.

How To Update To The Latest PayPal Integration (Existing PayPal Users)
For anyone already using our legacy PayPal integration, we recommend updating to the latest integration by following these steps:
1. Log in to your Create account
2. Click Shop from the top menu, followed by Payment Gateways
3. Click the Edit this payment gateway next to PayPal in the payment gateway list

4. Click the Update your PayPal connection button to begin the update process

5. A pop-up window/tab will open requiring you to sign in to your PayPal account. Once signed into your account and you have confirmed the details, a button will display to take you back to Create. Please do not click this button, instead use your mouse and right-click on this button, and choose the option to open in a new tab.
Your PayPal account should then be connected and displayed like in the image below.

How To Adjust Your PayPal Checkout Settings
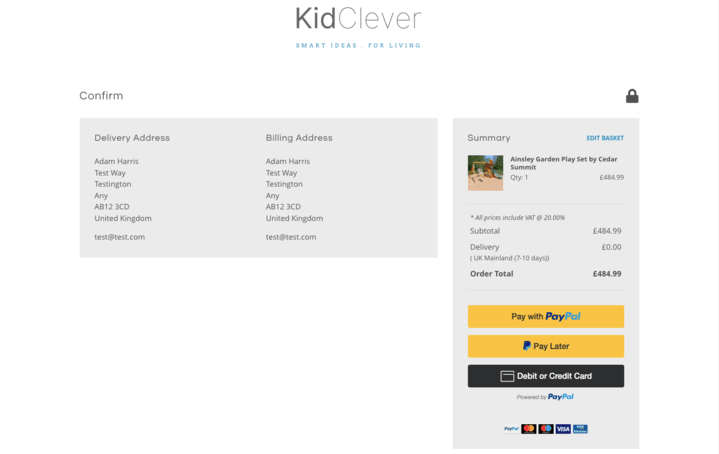
Show Paypal Checkout On Basket
You can enable PayPal to show at the basket allowing customers to complete their purchase quickly. The Show PayPal Checkout on Basket toggle is found within the PayPal settings.

With this option set to ON, customers will see a PayPal Checkout button when viewing their basket, allowing them to use PayPal to complete their purchase, without having to separately enter their address details in the standard checkout.

Hide Proceed to Checkout Button
If PayPal is the only payment gateway you have connected to your Create shop, then you can choose to hide the 'Proceed to checkout' button entirely. When this is set to ON, customers will use PayPal to complete their purchase with no need to enter billing details separately during the checkout.

How To Enable PayPal 'Pay Later'
Pay in 3 is one of PayPal’s Pay Later options supported by our latest PayPal integration. With PayPal ‘Pay Later’, your customers can pay over time interest-free but you will still receive the full payment up-front. For UK customers, there is a minimum basket value of £30.00 (set by PayPal) in order to use this option. For other countries, the minimum value will differ. For more information, we recommend visiting PayPal’s information here.
On our Business plan, you can enable a Pay Later button to display at the basket & checkout, as shown in the examples below.
Pay Later displayed at the basket

Pay Later displayed at the checkout
To display a PayPal 'Pay Later’ button on your basket and checkout, access the PayPal settings in your Create account (Shop > Payment Gateways > Edit PayPal Gateway). If you are on our Business package, you will see additional options; an Enable ‘Pay Later’ toggle and Show ‘Pay Later’ on Basket toggle. Turn both of these ON to display the option both on the checkout and the basket.

In addition to the buttons, customers on our Business package can also display PayPal branded on-site messaging to promote that your website supports PayPal ‘Buy Now, Pay Later’ options.
For more information about this and how to enable it on your website, please see this help guide.
How to Accept Apple Pay and Google Pay Payments through PayPal
Through your PayPal payment integration, you can offer customers the use of Apple Pay and Google Pay directly from their basket, as long as their devices meet the required criteria. For further details of how to enable this and start accepting these payments from your customers, through PayPal, please refer to this help guide.
Related Articles


More Questions?
If you have any further questions, please get in touch and we will be happy to help.
Get in Touch