Help Centre
Support > Ecommerce > Selling Online
How do I add a custom sold out banner to my site?
Using custom sold out banners gives you the option of displaying your sold-out products in a way that suits your business. For example, if your product was a one-off piece you may want the banner to simply say “Sold” or, if you were advertising new stock, you could label the banner as “Coming Soon”.
In this guide we will be looking at how to add your custom banner to your Create shop.
Please note this feature is not available to discontinued category listing layouts.
How to add your custom banner to your shop
Firstly you will need to create your banner externally using design software such as Pixlr or Photoshop. Here you can design your banner to fit in with your brand, by having your own colour scheme and choice of text! This banner will be shown for all sold out products within your Shop and you will need to ensure that your banner image is a maximum of 150x150px, as any images uploaded that are larger than this will not be available for display. Finally, please save this image to your computer, ready to upload to your Create account!
Now you have created your banner and saved it to your computer you will need to upload your banner image to your “Images” area, which can be accessed via the left-hand menu of your “Content” screen. You can read exact instructions on how to upload your image to this area in our guide here.
Lastly, you will need to link your custom banner to your shop. To do this please follow these steps:
- Go to your “Shop” area on the top menu
- Select “Settings” from the left-hand menu
- Click “General Configuration”
- Choose the “Stock Control” tab
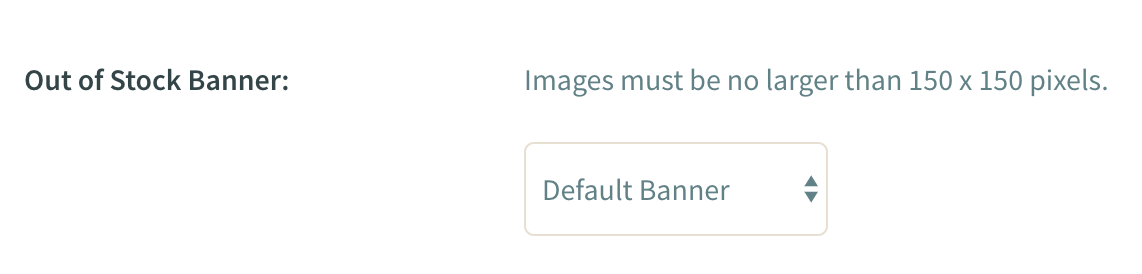
- For the “Out-of-stock Banner” option choose your image from the drop-down list. This will show all images under 150x150px from your “Images” area so you can choose the one you wish to use
- When you have chosen your image select the “Save Changes” button.
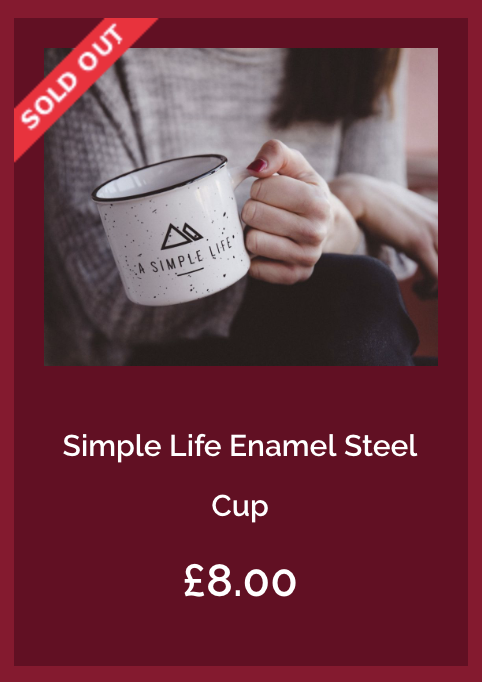
This change will then go live automatically onto your live site and update your banner on all your shop products, as seen below:
Related Articles
More Questions?
If you have any further questions, please get in touch and we will be happy to help.
Get in Touch