Help Centre
Support > Ecommerce > Selling Online
Uploading your products to Google Merchant Center - Apparel & Accessories
If you are just getting started with Google Merchant Center, please first read our introduction guide here.
Google Merchant Center now require you to include some specific fields if you have any products that are in Google's "Apparel & Accessories" category (or any of its sub-categories). If you would like to add your products to Google Shopping and some of your products fall into this category, you will need to manually update your CSV of products, before uploading it to Google Merchant Center.
If none of your products are in this Category, you can follow this guide for uploading your products to Google Merchant Center.
To see what subcategories fall under the category of "Apparel & Accessories" you can check on Google's taxonomy here.
In this guide, we will be covering how to download your feed of products from Create, what fields you will need to add and how to then upload to Google Merchant Center.
Please note that this guide is intended for users who are familiar with using spreadsheet software on their computer.
Downloading your product Feed from your Create account
Once you have set up your product's to comply with Google Merchant Center, you can download your feed ready to use.
To download your feed, please follow the steps below:
- Log in to your Create account.
- Click Shop from the top menu.
- Click Sales Channels from the left-hand menu.
- Click Google Merchant Center
- Click "please click here" next to "To download your product feed for Google Merchant Center and upload it manually,". This will allow you to save the products feed to your computer.
Editing your feed
Once you have downloaded your feed, to edit it, you will need to open it with your spreadsheet software such as Microsoft Excel, Open Office, Numbers etc.
Then you will then need to insert some new columns to specify your "Apparel & Accessories" variants.
The following information has been sourced from Google's help pages which you can find here.
The variants you will need add to your spreadsheet columns are:
- Color - Required for all items under "Apparel & Accessories"
- Size - Required for all items that belong to a subcategory of "Apparel & Accessories > Clothing", or "Apparel & Accessories > Shoes"*
- Age Group - Required for all items under "Apparel & Accessories"
- Gender- Required for all apparel items under "Apparel & Accessories"
You will need to add these as columns onto your spreadsheet and fill in for any relevant products. Below you will find what you need to title these columns as, and what you can fill in for these variants.
Colour
Spreadsheet column heading: [color]
Spreadsheet row example: Black, Green, Pink
More info: Use consistent names of colors across variants of the same product, as well as across multiple products of the same category. Please note that the spreadsheet heading for this must be the American spelling [color] for this field to be accepted in the Merchant Center.
Size
Spreadsheet column heading: [size]
Spreadsheet row example: Small, Medium, Large, Extra Large
More info: If sizes are complex, condense them into one value (e.g., "16/34 Tall" for neck size 16 inches, sleeve length 34 inches, and "Tall" fit). Use consistent size values across variants of the same product, as well as across multiple products of the same category. For example, within a group of t-shirts, use "S", "M" , and "L" as sizes, not "S", "Medium" , and "Lrg".
Age Group
Spreadsheet column heading: [age_group]
Spreadsheet row example: Adult, Kids
More info: The only two accepted values of this attribute are, "Adult" and "Kids".
Gender
Spreadsheet column heading: [gender]
Spreadsheet row example: Male, Female, Unisex
More info: The only two accepted values of this attribute are "Male", "Female" and "Unisex".
Item group ID
Spreadsheet column heading: [Item Group_Id]
Spreadsheet row example: parent1, parent2, parent3
More info: The attributes "color", "material", "pattern", and "size" are used to describe how one product varies from another in the same group. In addition to the variant attributes it is required to include the apparel attributes -- "color", "age group", "gender", and "brand" -- to describe and identify your apparel products.
An "Item group ID" attribute will have common values for a group of variants.
Any apparel item that is the same, but varies by "color", "material", "pattern", and/or "size", must be submitted as a unique combination of variant attributes, clustered in a group where each unique combination of variant attributes is identified by the same 'item group id'.
So, for example, if you have a pair of trousers for sale that comes in three possible colours, each colour will need to be listed as a single product, but linked together by one "Item group ID" - say "parent1".
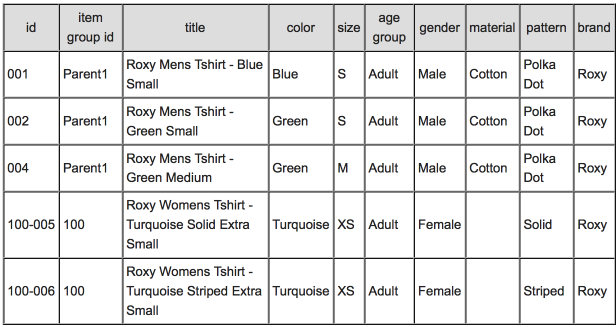
An example spreadsheet with product variants grouped by "Item group ID".
Uploading your Product Feed to Google Merchant Center
Once you have saved your feed from your Create account and added all your new fields, you will be able to upload it to your Google Merchant account.
To do this, please follow the steps below:
- Log in to your Google Merchant Center account.
- Click 'Products' >> 'Feeds' in the left-hand menu.
- Click the blue + icon towards the top of the page.
- Select your language and click 'Continue'.
- Enter a 'Primary feed name' (this is for your reference only) and then select 'Upload' and click 'Continue' again.
- In the first box, you'll need to enter your feed's 'Filename' as shown in the Product Promotions area of your Create account. It should look something like googleBase_productFeed_123456.txt.
- Click 'Upload a file now (optional)' and click BROWSE which will allow you to browse your computer and upload your previously downloaded product feed.
- Finally, click 'Create feed'.
- Please note: The upload may take several minutes, depending on the size of your file and the speed of your Internet connection.
- Once your file has been uploaded, you'll see notifications on your screen if the upload was a success.
The status of any feed can be found on this Feeds page. It can take up to 24 hours for your file details to be updated in your account.
Manually updating your feed.
If you change your products often, you will need to regularly download a version of your feed from your Create account, edit it as needed and update it to your Google account just by repeating the steps specified above again. Every time you change a product that is listed on your website,
All set to start advertising your products.
Your products will now be active on your Google Merchant Center account and you can now go in and set up your Product Listing Ads to start adverting your products on Google Shopping results.
Please be aware that the specifications needed above may vary depending on the product type you are listing. For clarification, please be sure to check your product type on Google's help pages here: https://support.google.com/merchants/answer/188494?hl=en
Related Articles


More Questions?
If you have any further questions, please get in touch and we will be happy to help.
Get in Touch