Help Centre
Support > Ecommerce > Accepting Payments Through Your Shop
How To Set Up Worldpay Ecommerce Payment Gateway
To connect your Create website to a Worldpay Gateway, 3 items are required which you need to enter into your Create account. These items are as follows:
Profile ID
Access Key
Secret Key
In this help guide, we will explain where to add these items to your Create account and how to locate them within your WorldPay Business Center.
If you are looking for information and details about the WorldPay Dashboard (a separate login/dashboard from the Business Center), please click here to be taken to the relevant section of this help guide.
Setting Up a WorldPay Account
To use WorldPay with your Create website, you will need to complete an application with WorldPay to apply for the service. Please visit this link to begin the process. To help you complete the application, WorldPay recommends that you follow the instructions outlined in this resource.
If you already have an account with Worldpay (either Gateway and/or terminal) please treat this as a brand-new application, separate from anything else you might have with WorldPay.
If you need any assistance completing the application, please contact WorldPay support directly, using the following details:
Email: ngwcustomerservice@fisglobal.com
Phone: 0330 333 1233
After completing your application and being approved by WorldPay, you should then be able to proceed with the integration process outlined below.
Adding The Worldpay ECommerce Gateway To Create
To begin the process of adding the Worldpay ECommerce Gateway to your Create account, please follow these steps.
1. Log into your Create account
2. Hover your mouse over Shop from the top menu, followed by Payment Gateways from the drop-down menu
3. Click the Add Gateway button
4. Our range of supported gateways will be displayed, click on the WorldPay option which states the following text:
Please add this gateway if you are migrating from Create Payments (see image below)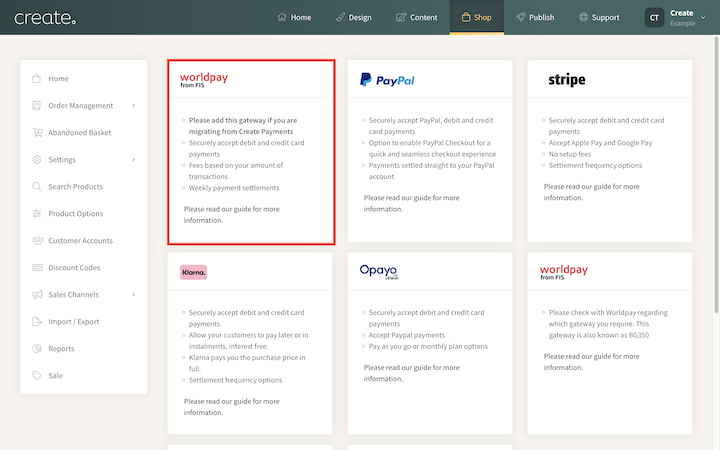
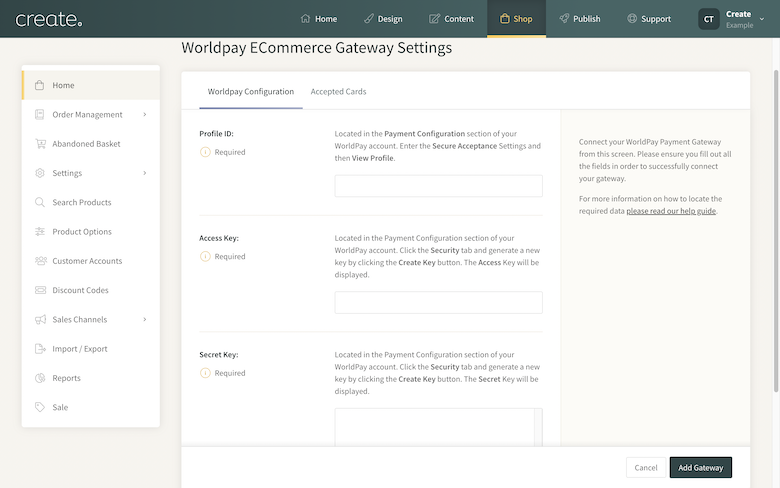
5. After clicking on the WorldPay option, the following screen will be displayed. This is where you will need to enter your Profile ID along with your 2 Keys.
To locate the above items within your WorldPay account, follow the steps below after you have set up an account with WorldPay.
We recommend having two tabs open in your browser to complete this, one with your Create account open, with the above screen displaying. A second tab with your WorldPay account open. This will make copying and pasting the codes into your Create account easier.
Profile ID
1. Log into your WorldPay account
2. Expand the left-hand dashboard menu (if it is not already)
3. Locate Payment Configuration and expand it
4. Click Secure Acceptance Settings from the drop-down menu
5. In the Merchant ID field, click the drop-down and select the Merchant ID which ends 'gbpgbpe' . Please also make sure you have selected the Profile Status to be set to INACTIVE. After clicking the Search button your profile should be displayed in the Inactive Profiles section
6. Click the 3 dots followed by Edit Profile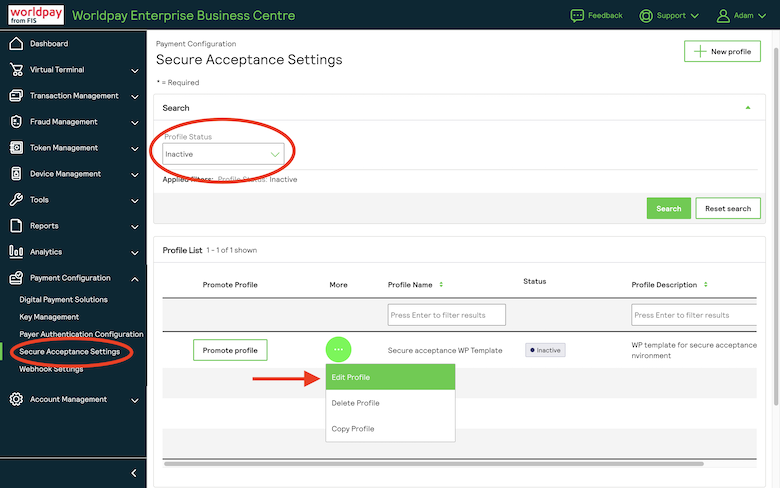
7. A screen will then display your Profile ID, copy this and paste it into the Profile ID in your Create account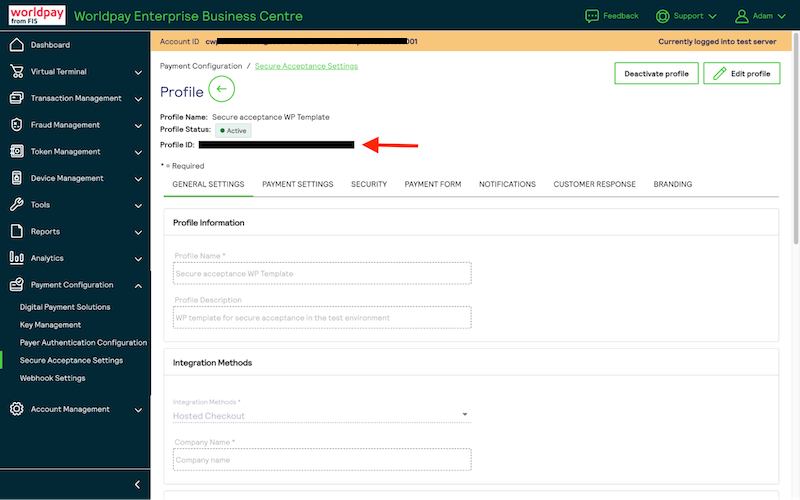
Access Key and Security Key
1. From the Profile screen you were on previously, click the Security tab
2. Click the + Create Key button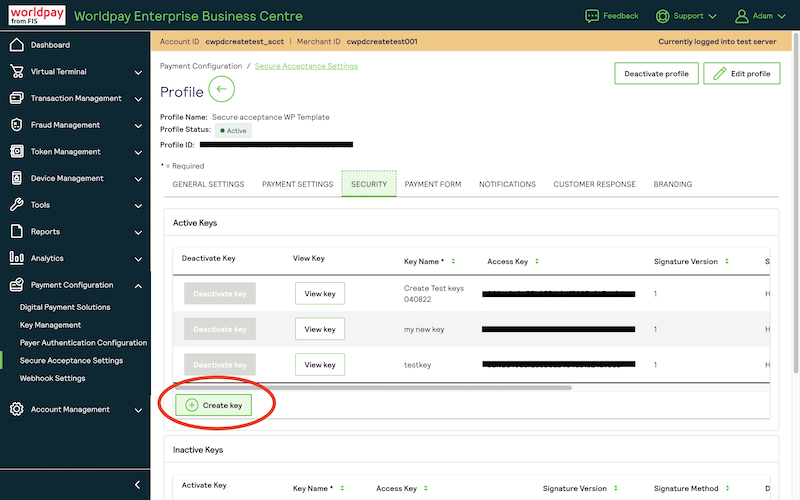
3. Supply the key a name (it can be anything, for example, your website name) click Create and confirm your selection
4. An Access Key and Secret Key will then be generated and displayed in the panel for you
5. Copy the Access Key and add this to the Access Key section in your Create account.
6. Return to your WorldPay tab, copy the Secret Key and add this to the Secret Key section in your Create account.
7. Back in your WorldPay account, after seeing the new key listed under ACTIVE KEYS, set the profile to active by selecting by clicking the Promote Profile button located at the top-right of the screen, and click Confirm.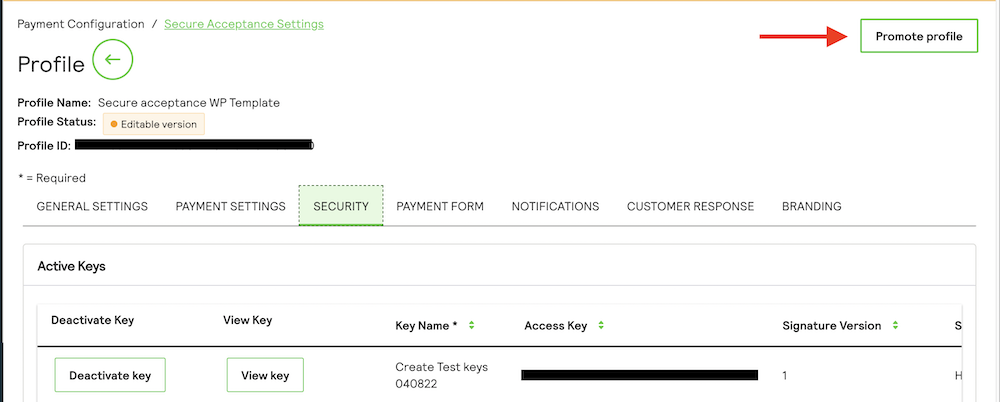
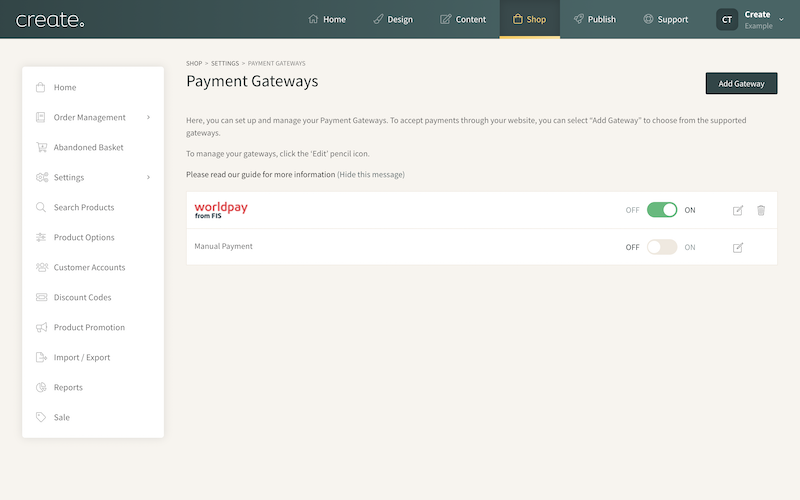
8. Return to your Create account. You should now have the Profile ID and both Keys added. To complete the integration with your website click the Add Gateway button.
9. WorldPay should now be added to the list of payment gateways on the Payment Gateway screen. Ensure that this enabled to ON
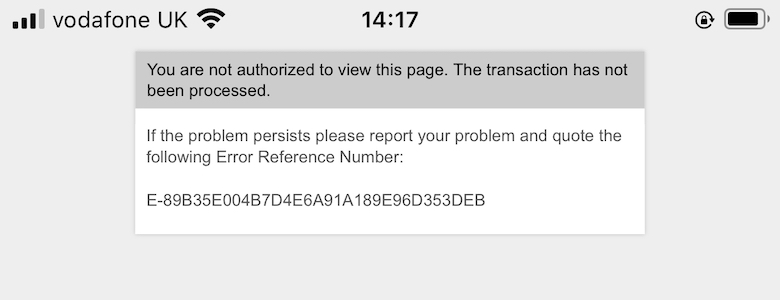
Once you have added WorldPay and enabled it, we recommend visiting your live website and making a basket. Once you proceed through to the checkout, you should see WorldPay displayed as one of the payment methods. As long as you can proceed through WorldPay and enter debit/credit card details, your connection is active.
If when trying to proceed through to WorldPay you see an error, such as the example below, please go back to your WorldPay account and make sure that you have entered your Profile ID and Keys, exactly as they appear in WorldPay.
After you have followed the steps above and WorldPay has been successfully added, we recommend turning off Create Payments (if you have not already done so). You can disable the Create Payments gateway by turning the green toggle next to the gateway to OFF.
Security Keys Expire
Please note, for security purposes, the Access Key and Secret Key will expire after two years. WorldPay should notify you by email leading up to their expiry date at which point you will need to generate new keys and input them into your Create account.
If the keys expire and new ones are not updated, you will no longer be able to process payments via the WorldPay payment gateway until they have been updated.
For more details about updating your keys, please refer to this help guide.
WorldPay Dashboard
After setting up your WorldPay account, you should soon receive an invitation from WorldPay to gain access to their new WorldPay dashboard. This is a separate dashboard location and you will be supplied with a unique login. It will provide you with further insights and detail of your transaction data.
The dashboard will provide you with the following:
• View and download your invoices
• Accept and settle in multiple currencies
• Check your settlements and help
Access to the dashboard can be found here
If you haven't received details or communication about this new dashboard, please contact WorldPay directly who will be able to advise you further.
Please refer to: enquiries@fisglobal.com and the customer helpdesk at 03457 616263
Related Articles


More Questions?
If you have any further questions, please get in touch and we will be happy to help.
Get in Touch