Help Centre
Support > Designing and Building Your Website > Designing Your Website
Introducing Product Blocks & Card Styles

Jump to Section:
We've launched a whole range of new Blocks designed to make adding products into your Content Pages a breeze. When you’re building your home page (or on any other Content Page) you’ll now find it’s quick and easy to drag in a row of products for a “New In”, “On Sale” section, “featured product” or maybe even to promote a service you have, simply choose the layout you’d like and then add in the product photos and details.
Alongside this there are new design styles for Blocks available in your Block Settings, if you’re using Blocks with Cards you’ll now be able to choose the look of these from a number of presets created by our expert designers. Whether it’s a simple scandi style or an elegant border there’s plenty to choose from to help you make your website unique to you.
Read on below to find out more about how you can get started with these on your Create website.
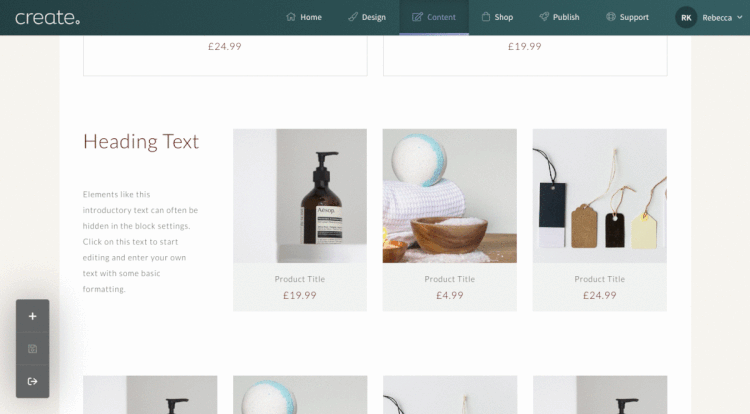
Product Blocks

Product Blocks offer a new and intuitive way to showcase featured stock on your ecommerce store. There are eight exciting new Blocks to choose from, each has a unique layout that has been specifically designed to help drive traffic from your pages to your products, or highlight your services.
Each of these Blocks can be customised in the same way as all of Create's other Blocks so that you can achieve the perfect look to fit the aesthetic of your site.
There’s also a new option on these blocks called Item Badges. Item Badges allow you to add a label to each Product Item, the label can be used to display your own customised text, such as “Special Offer”, “Just In”, “Limited Time Only” or whatever else you want to convey to your site visitors in a pinch.
See all the Product Blocks in action on our Harmony & Home Demo Website >>
Where to Find Product Blocks
- Log in to your Create account
- Select Content on the top menu
- Click Edit This Page (the pencil icon) next to the page you would like to add a Product Block to
- When the page you want to edit loads, click the + icon in the bottom left corner to bring up the Block Selector
- Select Product from the drop-down menu
Note: You can bring up more layout options for Product Blocks by clicking on them in the Block Selector. To add them to the page, simply drag and drop them to the position you would like or click them once more to add them to the bottom of your page.
How to Add Item Badges
-
Select Content on the top menu
-
Click Edit This Page (the pencil icon) next to the page you would like to add Item Badges on a Product Block to
-
Navigate to your Product Block and select Block Settings (toggles icon) from the right-hand menu

-
Click the Content tab in Block Settings
-
Switch on the Show Item Badge setting
-
Item Badges will now be displayed on your Product Block. Click inside the labels to edit the text
-
Save your changes
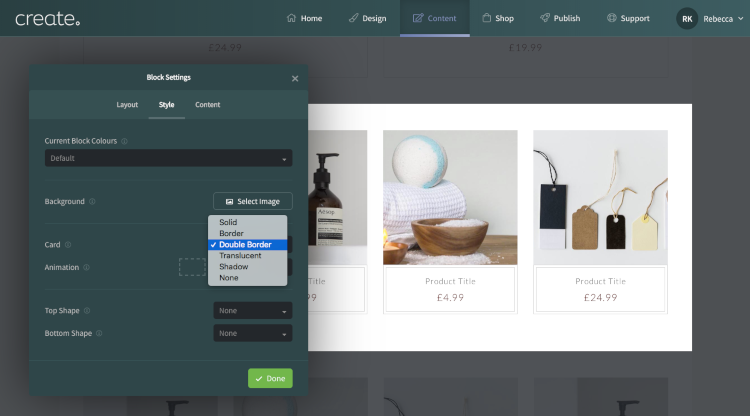
Card Styles

In addition to the release of our Product Blocks, there is a new option available for you in Block Settings to customise the Card Style on your Blocks.
Cards are the overlays and backgrounds of text and images within your Blocks. For example, the screenshot above shows the three different styles that are available displayed on a Hero Block with a Card. From left to right they are Solid, Translucent and Shadow.
There are six new Card Styles for you to choose from, these can be applied to any Block that's in the Card section of the Block Selector.
You can see the Styles changing on the Card Items in the screenshot above. Consider changing the design of one of the Blocks to make it stand out from the rest or use it throughout for consistent brand styling.
There's plenty to choose from including the solid card background you have now. Try out a delicate border, smart shadow, or a translucent background and see what works best for your look. There's also the option to select no style at all if you want to keep things very simple.
How to Change Card Styles
-
Select Content on the top menu
-
Click Edit This Page (the pencil icon) next to the page you would like to change Card Styles on
-
Navigate to the Block you would like to make changes to and select Block Settings (toggles icon) from the right-hand menu
-
Click the Style tab in Block Settings
-
Choose the Card Style you would like from the Card drop-down menu
-
Save your changes
Feedback
We look forward to seeing these appearing on everyone's websites and hope you enjoy using these new features and designs.
If you have any feedback you would like to share with us on these features, please contact your Account Manager who will be happy to help.
Related Articles


More Questions?
If you have any further questions, please get in touch and we will be happy to help.
Get in Touch