Help Centre
Support > Designing and Building Your Website > Designing Your Website
How to use Drop-Down Menus
A drop-down menu ensures your site is unique and stylish yet easy to use. The ability to have multi-levelled menus allows your visitors to smoothly navigate around your site, moving from page to page with just one click of your menu bar. Additionally, for those who have a large amount of site content or many pages in your menu it gives you complete control over how to group your pages, creating a more organised website page structure.
In this guide we will address the following:
- How to build your drop-down menus
- How to add your Shop Categories to your Drop-Down Menu
- How to use your Sub-Menu side column item
- Drop-Down Menu enabled templates
How to build your Drop-Down menu
When using the Drop-Down Menu feature there are 3 types of menu:
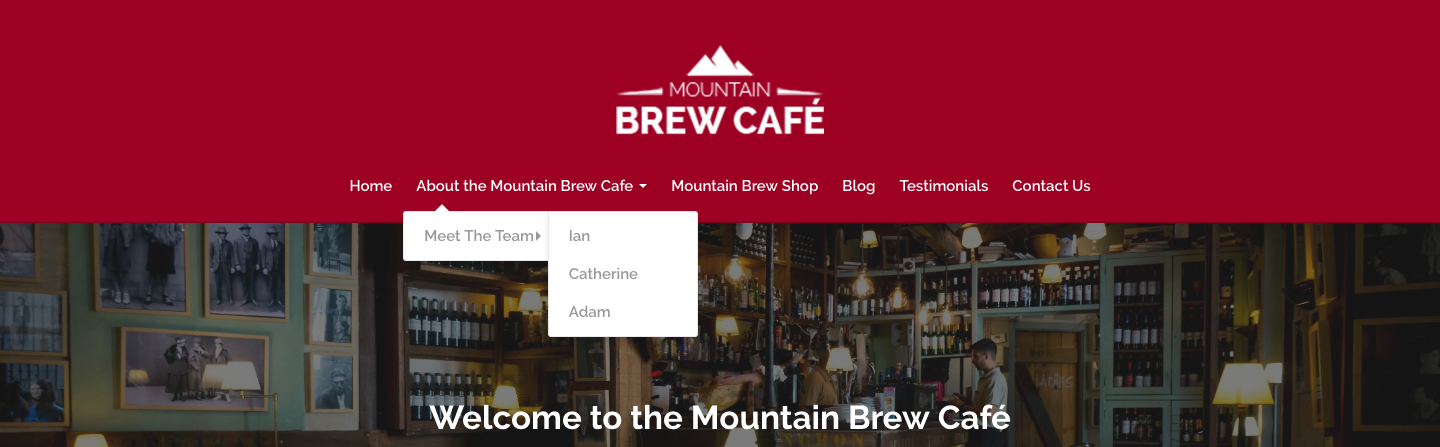
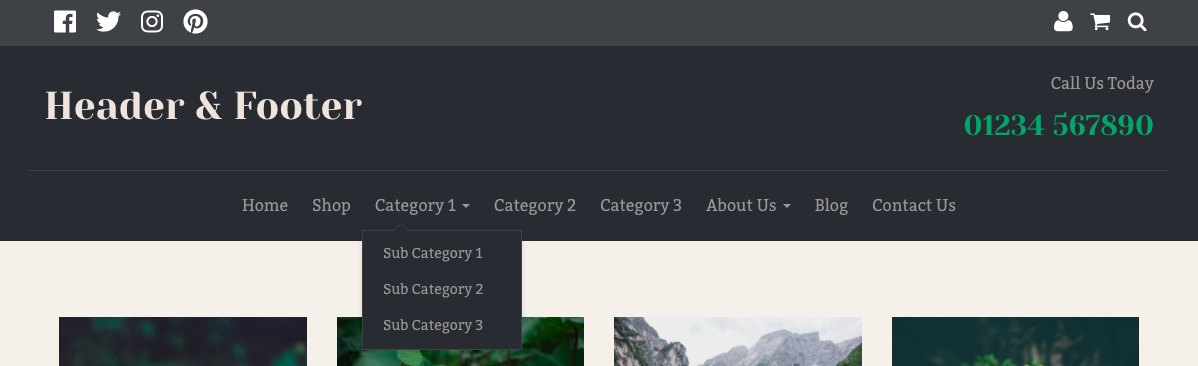
A Main Menu is the page at the top of your site that give your users access to the main pages. For example, the “Blog” page or “About Us” page shown below.

A Sub-Menu is the page displayed beneath your Main Menu. For example, the “Meet the Team” sub menu seen under the “About Us” menu shown below.

A Sub-Page is a page that can be accessed from your Sub-Menu. For example, the “Ian” page is accessed through the “Meet the Team Page” Sub-Menu.
Your “Site Content” screen is the main area you will use to manage your drop-down menus. Here you can easily set your site structure by dragging and dropping your pages into the order you want. You can also set up your Sub-Menus by dropping your pages into the grey Drop Zones that appear below your Main Menu page.
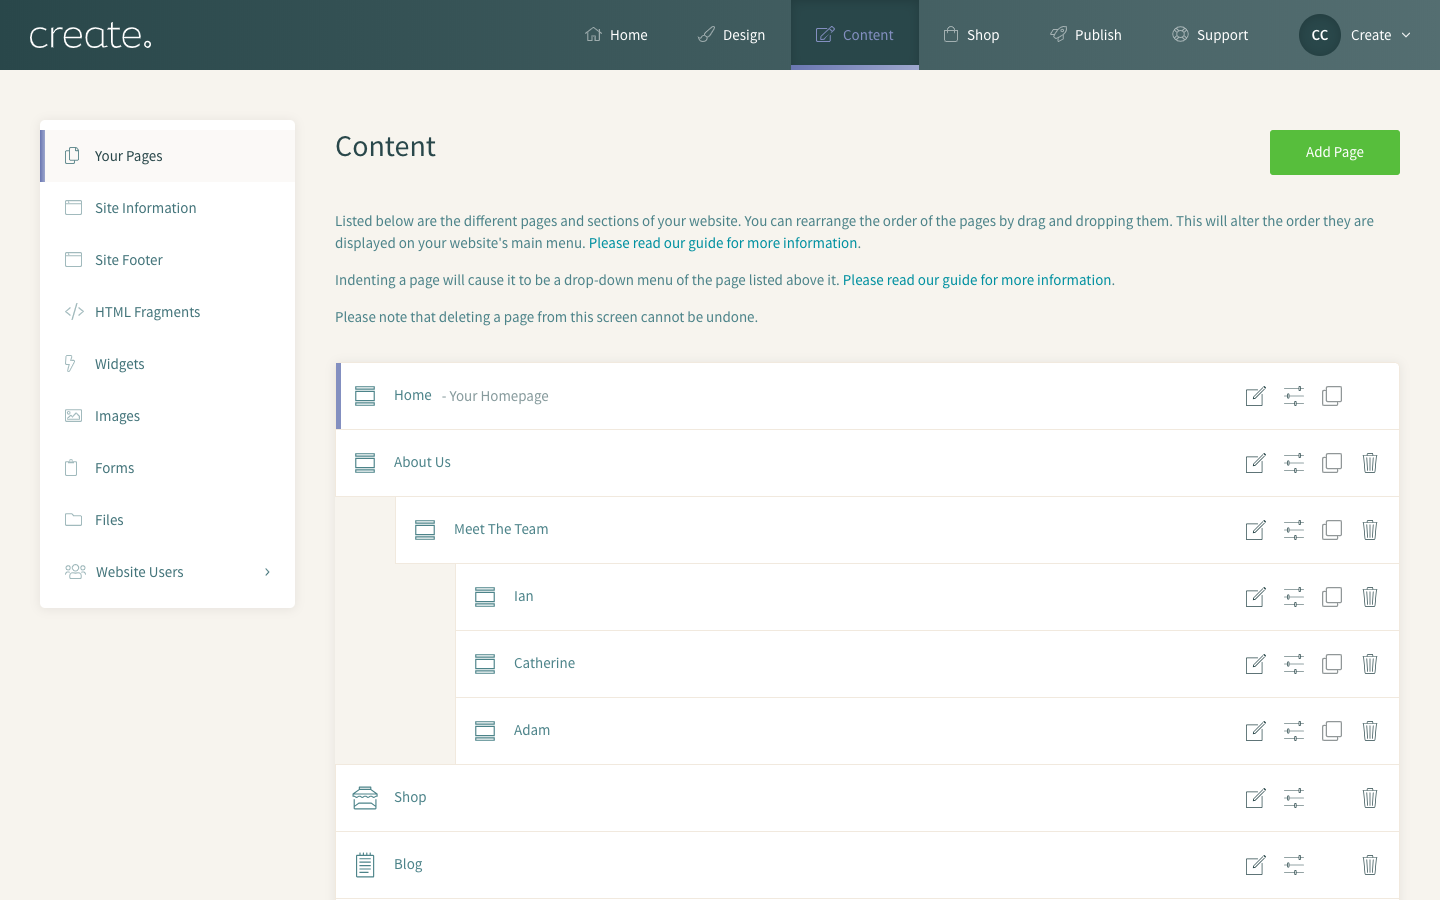
If you would like to set up Sub-Pages you can then drop them into the grey Drop Zones that appear to the right below your Sub-Menu.
When your pages are dropped your “Site Content” screen will automatically save your menu order, ready for next time.
Lastly, if you have a page you would like to direct your visitor to but do not want to display it on the Main Menu you can hide your pages.
To do so please follow these steps:
1. Go to your "Content" Screen on the Top Menu.
2. Select "Page Settings" next to your page.
3. Change the "Shown on Menu" drop-down list to "NO".
4. Click "Save Changes".
These hidden pages will now display as greyed out on your Site Content Screen and can still be reordered using the drag and drop functionality.
How to add your Shop Categories to your Drop-Down Menu
Here are following site menu layouts you can use with your drop-down menus:
- Display just your "Shop" main menu item on your main menu
- Display your "Shop" menu item with a categories drop-down menu on your main menu
- Display your "Shop" main menu item and your shop categories with a sub drop-down menu
- Display just your shop categories on your main menu
- Display just your shop categories with a sub-categories drop-down menu
Display just your “Shop” Main Menu Item on your Main Menu
Please follow these instructions:
- Go to your “Content” screen on the top menu.
- Select the “Page Settings” icon next to your “Shop” page
- On the “General” tab change the “Shown on Menu” option to “YES”.
- Also change the “Show Categories in a drop-down Sub-Menu” option to “NO”.
- Save your changes.
- Next, go to your “Shop” screen .
- Select “Shop Settings” from the left-hand menu.
- Click “General Configuration”.
- Choose the “Categories” tab.
- Change “Show Categories on Main Menu” to “Do not display”.
- Save your changes.
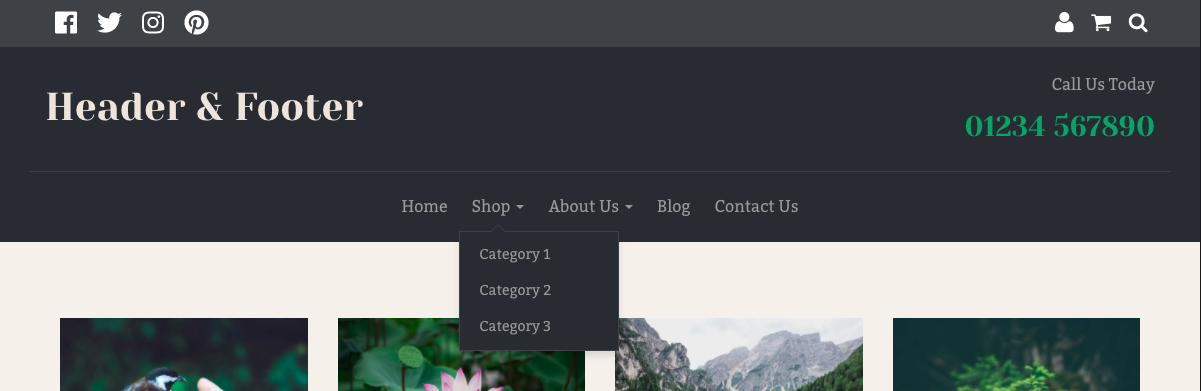
Display your “Shop” menu item with a categories drop-down menu on your Main Menu
Please follow the steps below:
- Go to your “Content” screen on the top menu.
- Select the “Page Options” icon next to your “Shop” page.
- On the “General” tab change the “Shown on Menu” option to “YES”.
- Also change the “Show Categories in a drop-down Sub-Menu” option to “YES”.
- Save your changes.
- Next, go to your “Shop” screen.
- Select “Shop Settings” from the left-hand menu.
- Click “General Configuration”.
- Choose the “Categories” tab.
- Change “Show Categories on Main Menu” to “Do not display”.
- Save your changes.
Display your “Shop” Main Menu Item and your Shop Categories with a sub drop-down menu
Please follow the steps below:
- Go to your “Content” screen on the top menu.
- Select the “Page Options” icon next to your “Shop” page.
- On the “General” tab change the “Shown on Menu” option to “YES”.
- Change the “Show Categories in a drop-down Sub-Menu” option to “NO”.
- Save your changes.
- Next, go to your “Shop” screen.
- Select “Shop Settings” from the left-hand menu.
- Click “General Configuration”.
- Choose the “Categories” tab.
- Change “Show Categories on Main Menu” to “Display as Main Menu Items with drop-down Sub-Categories”.
- Save your changes.
Display just your Shop Categories on your Main Menu
Please follow these instructions:
- Go to your “Content” screen on the top menu.
- Select the “Page Options” icon next to your “Shop” page.
- On the “General” tab change the “Shown on Menu” option to “NO”.
- Change the “Show Categories in a drop-down Sub-Menu” option to “NO”.
- Save your changes.
- Next, go to your “Shop” screen.
- Select “Shop Settings” from the left-hand menu.
- Click “General Configuration”.
- Choose the “Categories” tab.
- Change “Show Categories on Main Menu” to “Display as Main Menu Items”.
- Save your changes.

Display just your Shop Categories with a sub-categories drop-down menu
Please follow these instructions:
- Go to your “Content” screen on the top menu.
- Select the “Page Options” icon next to your “Shop” page.
- On the “General” tab change the “Shown on Menu” option to “NO”.
- Change the “Show Categories in a drop-down Sub-Menu” option to “NO”.
- Save your changes.
- Next, go to your “Shop” screen.
- Select “Shop Settings” from the left-hand menu.
- Click “General Configuration”.
- Choose the “Categories” tab.
- Change “Show Categories on Main Menu” to “Display as Main Menu Items with drop-down Sub-Categories”.
- Save your changes.
Related Articles
Related Articles


More Questions?
If you have any further questions, please get in touch and we will be happy to help.
Get in Touch