Help Centre
Support > Ecommerce > Processing Your Orders
How to Use Royal Mail Click & Drop Manual Import
With Create’s Order Management Tools, you can download your orders to import into Click & Drop all at once.
You can find out how to do so below:
How to Export Your Orders From Create
-
Select Shop on the top menu.
-
Click Order Management in the left menu
-
Select Orders from the expanded menu
-
Click on Export in the top right hand corner to open the Financial Transaction Export panel
-
Select Royal Mail (Click & Drop) from the Format drop down list

-
Use the Date Selector boxes to choose the order dates you’d like to include

-
Select the order status(s) you’d like to be included by ticking the boxes.

-
Click the green Download button to start the file download process
How to Import Your Orders to Royal Mail
-
Access the Dashboard from the top menu
-
Select Import Orders From A Spreadsheet

Step 1
-
Click the blue Upload a File button and select the .csv file you’ve just downloaded from Create.
-
Select Comma from the Column Delimiter drop down list

-
Click the blue Upload File button
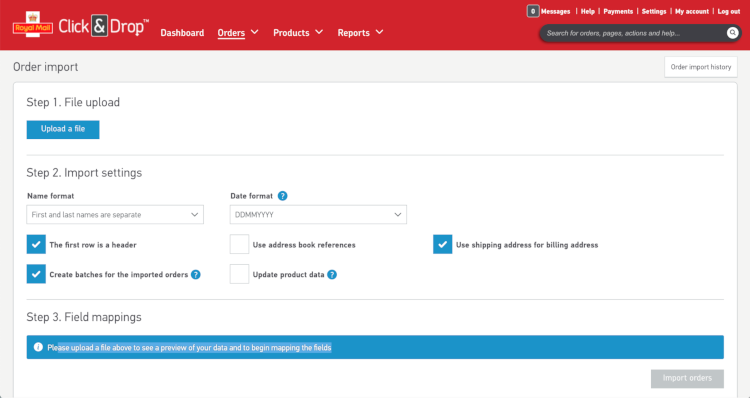
Step 2
-
Select First Name and Last Name are separate from the Name format drop down list
-
Select DDMMYYYY from the Date format drop down list
-
Ensure the box The first row is a header is ticked
-
Ensure the box Use shipping address for billing address is ticked
-
If you have over 100 orders in your upload file ensure the box Create batches for the imported orders is ticked
Step 3
You’ll be mapping your columns to match up your spreadsheet information with what Royal Mail requires. Royal Mail will remember your choices for this so you’ll only need to map it once.
*Royal Mail will clearly state the required fields you have mapped, by showing a green tick next to the field. Please ensure that that all required fields are mapped.

-
Choose each column name from the drop down list to match the name of the column, there are a couple listed that you don’t need to map which you’ll see in the full list below:
Order reference
Special instructions
Date
Weight
Package size
Sub-total
Shipping Cost
Total
Currency Code
Service Code
Safe place (you don’t need to map this)
Address book reference
Customer title
First Name
Last Name
Fullname (you don’t need to map this)
Phone
Company Name
Address Line 1
Address Line 2
Address Line 3
City
County
Postcode
Country
Name
Unit price
Quantity
Unit Weight
-
Click the blue Import Orders button to process the order information into Royal Mail’s system.
Now that you’ve uploaded the orders you’ll be able to print your postage labels and book your parcels. For the steps on how to do this please see Royal Mail’s guides on Processing Your Orders >>
Feedback
Log in to your Create Account and get started >>
The new Order Management is still in its BETA phase and as a result, there may be some minor issues that you come across. If for any reason you need to access the old Order Management system you can do so at any time by clicking the link at the top of the new Order Management.
If you do experience any problems using the new tools or have any suggestions you would like to share with us on this feature, please contact your Account Manager who will be happy to help.
Related Articles


More Questions?
If you have any further questions, please get in touch and we will be happy to help.
Get in Touch